

The Eye Makeup Mistakes That Emphasize Hooded Eyes (and What to Do Instead)
Many women reach a moment when they look in the mirror and notice that their eye makeup no longer behaves the way it once did. Eyeshadow fades more quickly. Eyeliner that used to add crisp definition now feels heavier than expected. A technique borrowed from a favorite tutorial makes the eyes look smaller instead of brighter.
It is natural to assume that age explains everything. And while time certainly shapes the eye area, it is not the only influence. The underlying structure of your eyes matters just as much. Hooded eyes, for example, have always interacted with light and movement in their own way. As the upper lid softens over the years, those characteristics simply become more visible.
This doesn’t mean your routine needs to become elaborate. Often, the opposite is true. A small shift in placement can create more impact than adding another product. When you understand how hooded eyes respond to shadow, texture, and motion, your entire approach begins to feel easier. Eyeshadow continues to shape the eye, while eyeliner adds definition without overwhelming its natural proportions. The result is a brighter, more open appearance because you've chosen techniques that suit your features.
This guide looks at the habits that tend to emphasize hooded eyes and explains why they produce different results on this eye shape.
Every eye shape has its own visual language. The more fluently you understand yours, the more naturally every makeup technique begins to make sense.
Understanding Hooded Eyes

Every eye shape tells its own story through structure. Before choosing an eyeshadow palette or deciding where to place eyeliner, it helps to understand what makes hooded eyes unique.
A hooded eye has a fold of skin that rests over part or all of the mobile lid. For some people the hood is subtle. For others the lid space is almost entirely hidden when the eyes are open. Both versions are simply variations of the same anatomy, each creating a different kind of canvas.
As the years pass, these characteristics often become more noticeable. The skin of the upper lid softens. The brow may settle slightly lower. Even women who have always had hooded eyes often find that familiar makeup techniques no longer behave the way they once did. Eyeshadow disappears when the eyes are open. Eyeliner takes up more visual space than expected. Color transfers from the lid to the upper fold before the day is over.
These experiences are common. They are not signs of doing anything wrong. They are simply the natural result of applying makeup to an eye shape that moves throughout the day.
One of the easiest ways to recognize hooded eyes is to look at yourself in the mirror with your eyes relaxed. Not lifted or widened. Just at rest. Notice how much of your eyelid remains visible when your eyes are open and relaxed. See whether the fold covers part of the lid. Observe whether the crease becomes difficult to see. Pay attention to whether eyeliner seems to disappear beneath the fold unless you make it thicker.
These are neutral observations. They explain why certain techniques create different results.
Beauty Masterclass Note:
Hooded eyes don't need to resemble another eye shape to look beautiful. The more familiar you become with their structure, the more naturally every brushstroke begins to work with them instead of against them.
Many people have followed an eyeshadow tutorial step by step, only to find that the finished look appears completely different on their own eyes. If this has happened to you, you are not imagining it.
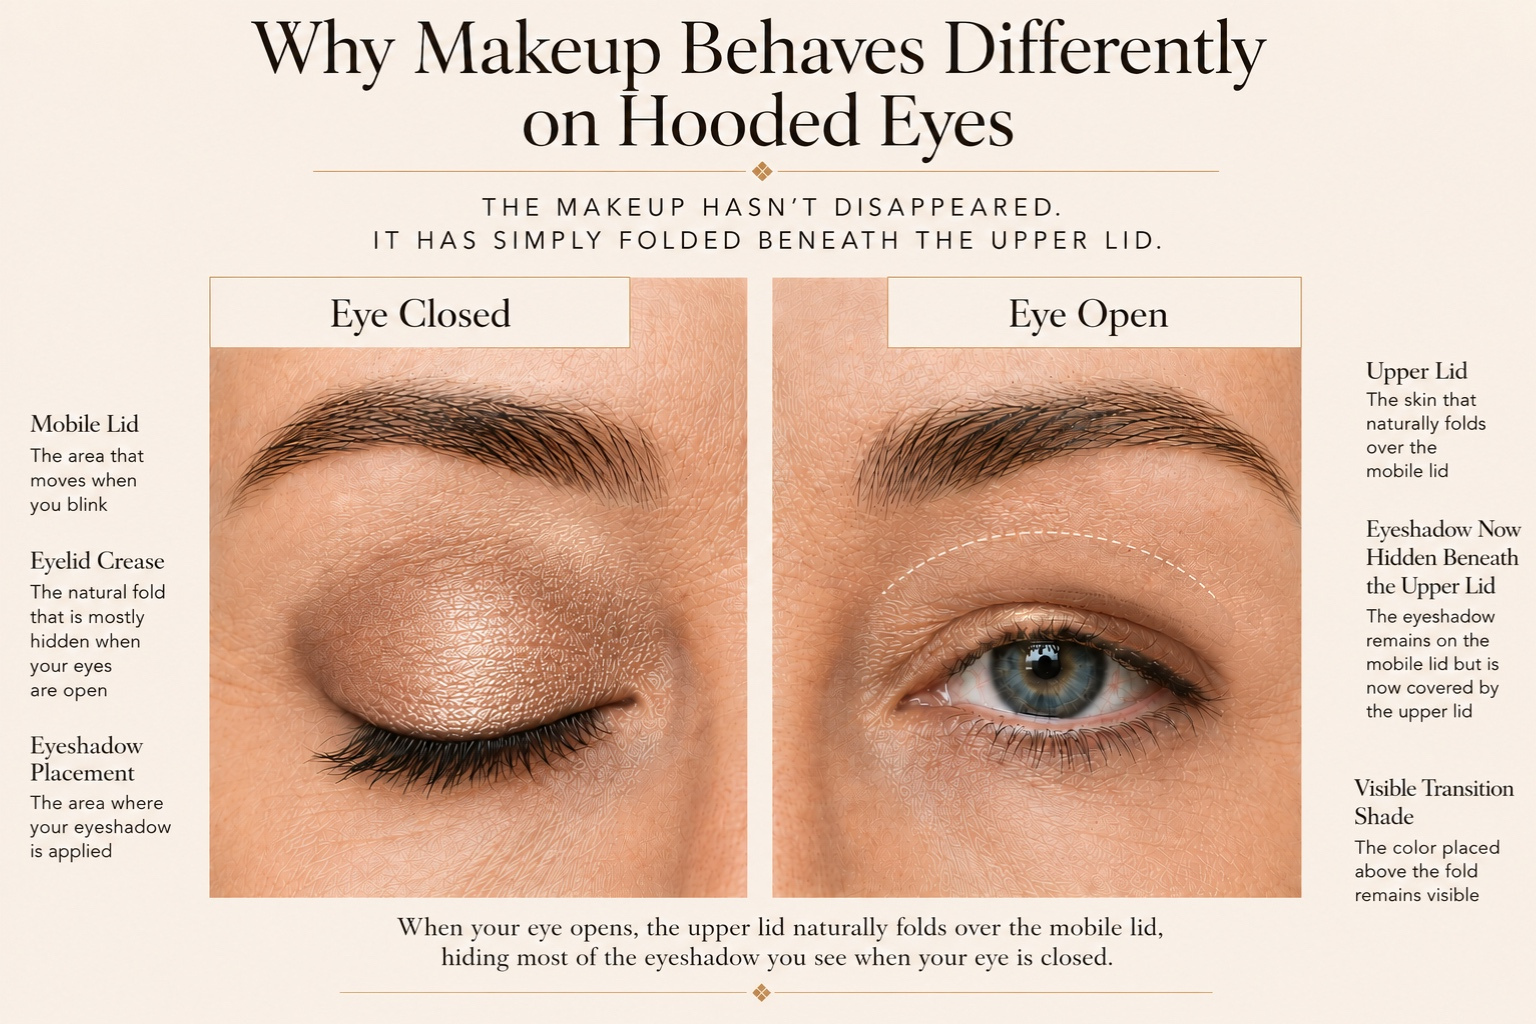
Most makeup demonstrations are filmed on eyes with a generous amount of visible lid space. Hooded eyes create a different kind of canvas. As the eye opens and closes throughout the day, the upper fold changes how much of the lid remains visible, where shadow settles, and how eyeliner appears from the front.
Visibility is one of the clearest differences. When your eyes are open in a relaxed position, part of the mobile lid may rest beneath the fold. Any eyeshadow placed only on that area can seem to vanish, even when it has been blended with care. The makeup is still there. It is simply sitting in a place that is no longer fully visible.
Movement influences the result as well. Each blink gently presses the upper lid against itself. Creamy formulas, richly emollient textures, or shadows applied without a primer are more likely to transfer onto the upper fold as the day goes on. This is why long‑wearing products and thoughtful placement often matter more than adding additional layers.
Light shapes the eye just as much as movement. The fold creates own pattern of light and shadow that shift depending on how light falls across the face. Makeup can reinforce those patterns or soften them. A transition shade placed slightly above the fold continues shaping the eye after it settles into its natural position, creating a softer contour without changing your features.
The most helpful idea to keep in mind is that hooded eyes do not require an entirely different approach to makeup. They simply benefit from placement that respects their structure. Once you begin paying attention to how each placement changes the overall shape of the eye, you'll often find that the products you've been using work far better than you expected.
Beauty Masterclass Note:
Good makeup begins with good observation.
When you understand how your eye shape interacts with light, movement, and placement, technique becomes intentional rather than trial and error.
The Eye Makeup Mistakes That Emphasize Hooded Eyes
The techniques in this section aren't mistakes because they're universally wrong. Most were developed for eye shapes with more visible lid space. Understanding how hooded eyes interact with light, movement, and placement makes it much easier to adapt them to your own features.
Applying Eyeshadow Only on the Visible Lid (and Following the Natural Crease)
One of the most common reasons hooded-eye makeup seems to disappear has nothing to do with the colors you've chosen or the quality of your products. It begins with where the eyeshadow is placed.
Most of us naturally think of the eyelid as the area we can see when our eyes are closed. Many makeup tutorials reinforce that idea by recommending that transition color be blended directly into the natural crease. On eyes with a broad, visible crease, those instructions often work beautifully.
Hooded eyes have a different landscape.
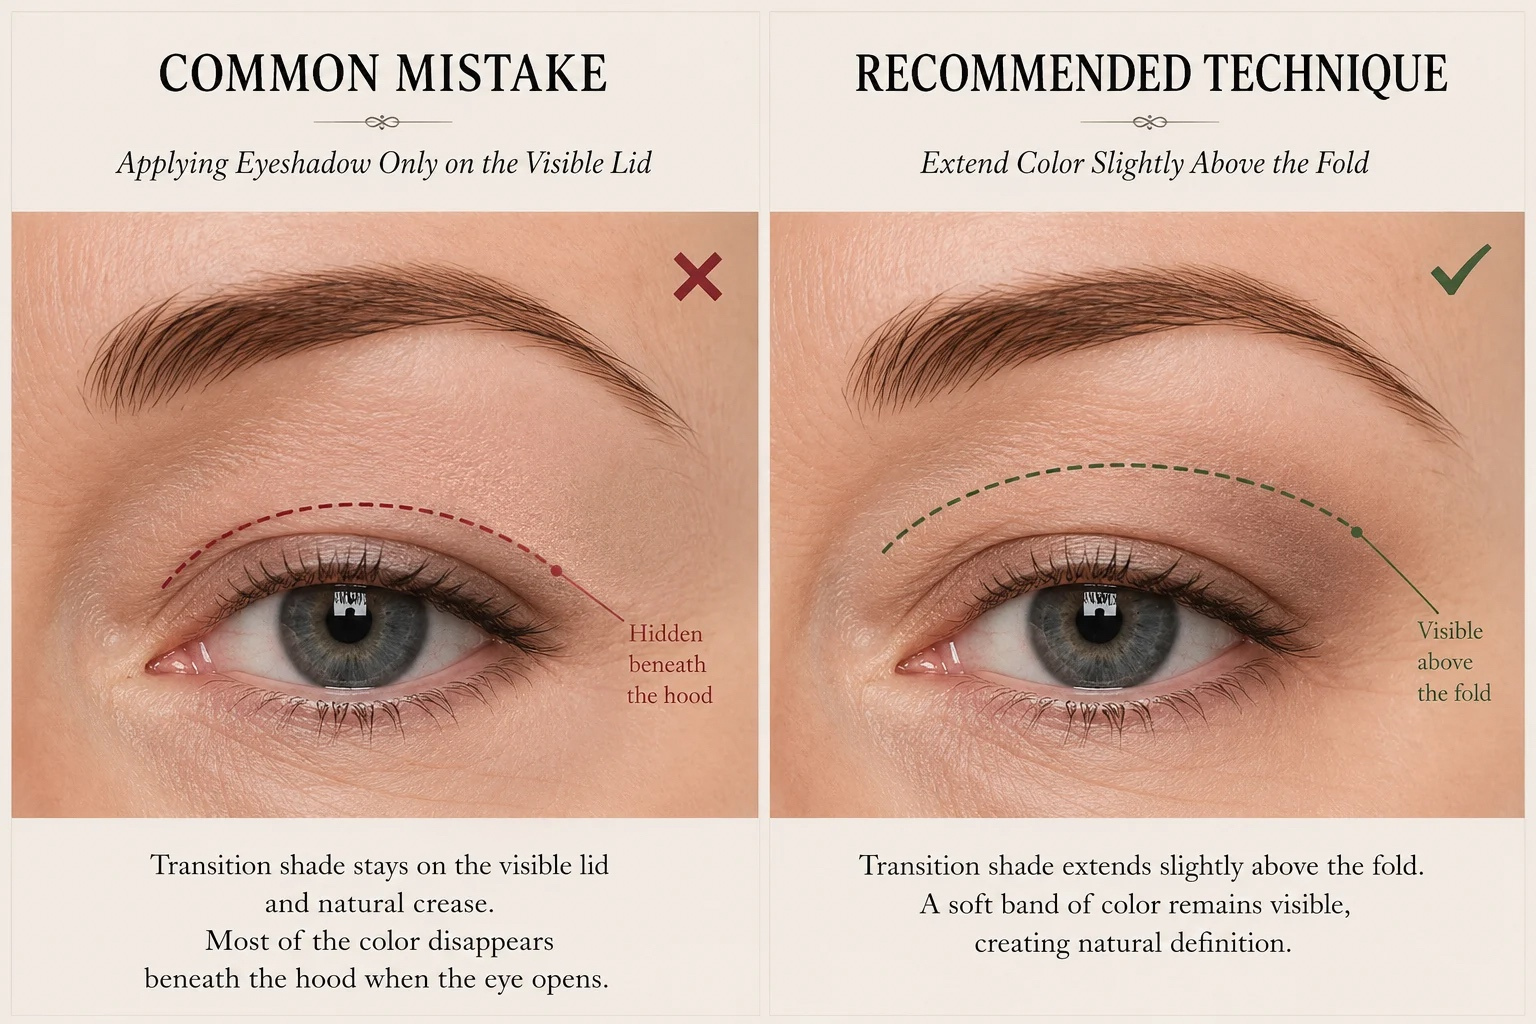
When the eyes open, much of the mobile lid tucks beneath the upper fold. In many cases, the natural crease becomes partially hidden as well. If your eyeshadow stays only on the visible lid—or follows a crease that disappears beneath the hood—much of your blending is no longer visible from the front. The makeup hasn't vanished. It's simply resting in a place that becomes concealed when your eyes return to their natural position.
This is why so many women feel frustrated after carefully following a tutorial. The blending looks beautiful while they're applying it, yet the finished result seems softer, smaller, or almost invisible once they step back from the mirror.
The goal isn't to create a completely new eye shape or pretend your natural crease doesn't exist. Instead, think of the crease as a reference point rather than a destination. What you're really creating is a soft transition that remains visible when your eyes are open.
By extending the transition shade slightly above the fold, you allow the contour to continue shaping the eye even after the lid settles into its resting position. The effect is subtle, yet it changes the entire impression of the makeup. The eyes appear more defined, the blending becomes easier to appreciate, and the shape you've created remains part of the finished look throughout the day.
For many women, this single adjustment becomes the turning point. Suddenly, eyeshadow no longer feels like something that disappears—it becomes something that quietly enhances the eye exactly as intended.
Beauty Masterclass Note
The most important lesson for hooded eyes is that your finished result should guide your placement—not your anatomy alone. Rather than asking, "Where is my crease?" begin asking, "Where will this color still be visible when my eyes are open?" That simple shift in perspective changes nearly every eyeshadow technique that follows.
Quick Technique
Look straight into the mirror with your eyes relaxed and open.
Apply your transition shade while looking forward rather than with your eyes closed.
Extend the color slightly above the fold so it remains visible when your eyes are open.
Step back from the mirror before adding darker shades to confirm the soft contour is still visible from a natural viewing distance.
Blending Straight Across or Downward
Once your transition shade is in the right place, the next question becomes how you blend it.
Many women naturally move their brush back and forth across the crease or slightly downward toward the outer corner. It's a comfortable motion, and countless tutorials demonstrate it without considering how different eye shapes respond.
On hooded eyes, however, the direction of your blending becomes part of the eye's overall shape.
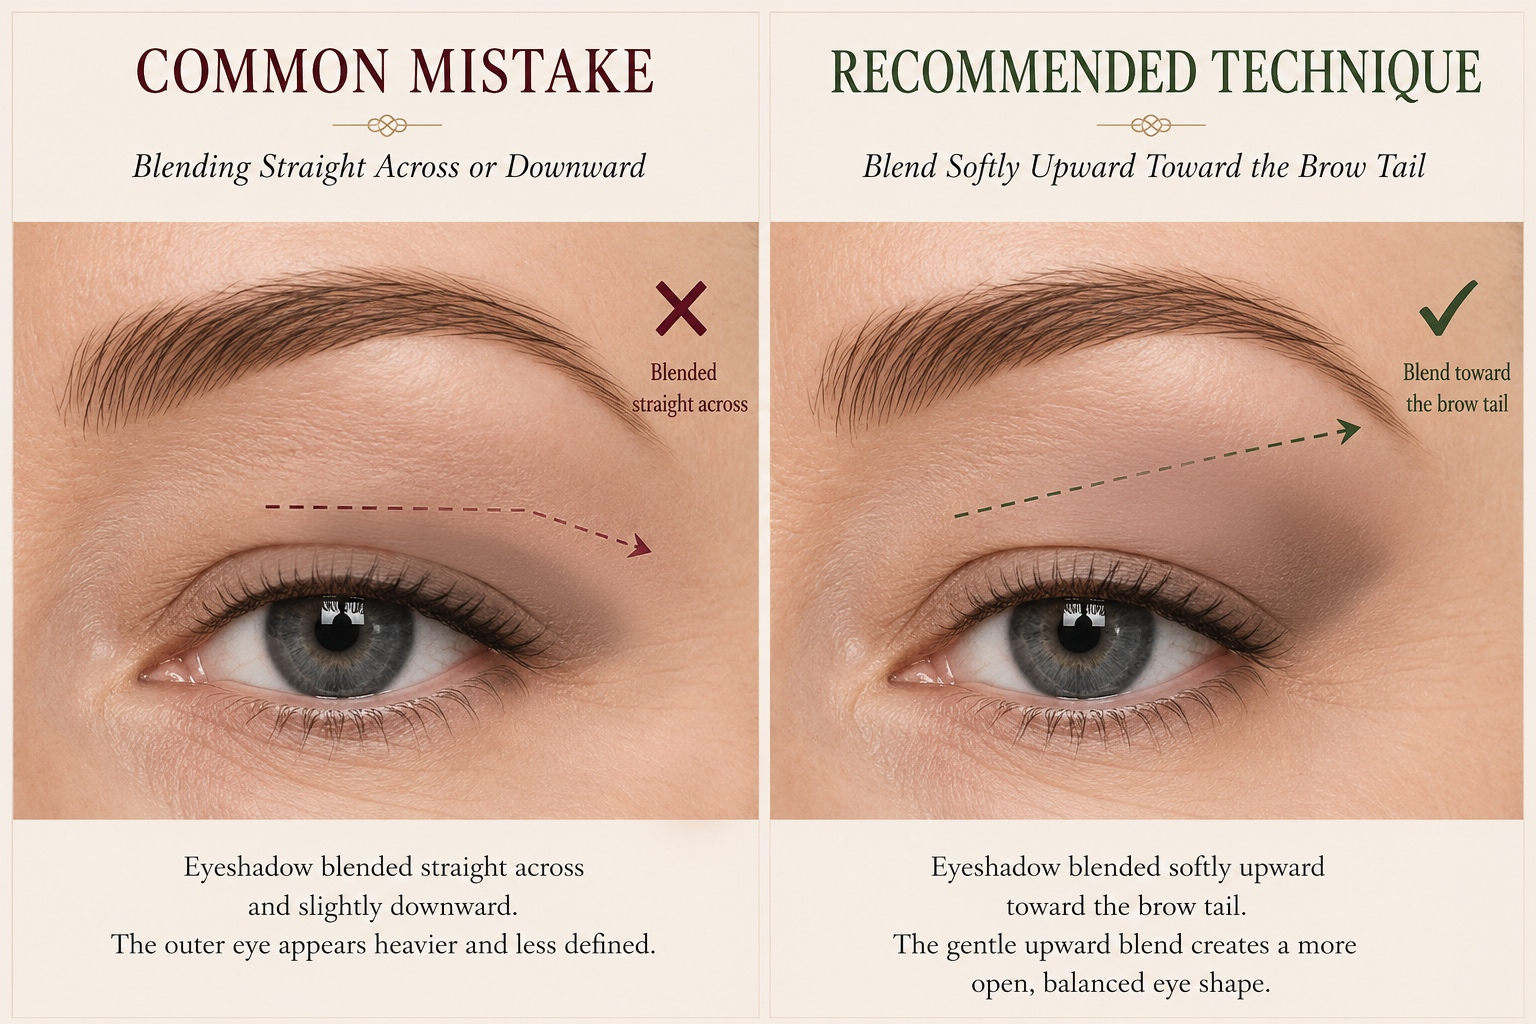
When shadow is blended horizontally—or allowed to drift downward toward the outer corner—it reinforces the natural weight of the hood. The eye can begin to appear shorter, flatter, or more tired, even if the blending itself is beautifully executed. Nothing about the application looks "wrong." It's simply encouraging the eye to travel in a direction that doesn't create lift.
Instead, think of each brushstroke as gently guiding the eye upward.
After placing your transition shade, allow your blending to soften toward the tail of the brow rather than toward the cheekbone. The movement should feel gradual and effortless, creating a subtle diagonal that follows the natural architecture of the face. You aren't trying to create a dramatic cat-eye effect. You're simply encouraging the eye to travel slightly upward instead of outward.
One of the reasons this works so well is that our eyes naturally follow lines and gradients. Even a soft haze of color can influence the way the eye is perceived. A slight upward angle creates the impression of lift and openness without requiring heavier makeup or sharper lines.
This principle carries through almost every technique that follows in the Beauty Masterclass. Eyeshadow, eyeliner, and even the placement of deeper shades all contribute to the same visual direction. Once you begin thinking about movement instead of individual brushstrokes, your makeup starts working together as one cohesive design.
Beauty Masterclass Note
Every brushstroke has a direction. On hooded eyes, blending upward is less about creating drama and more about supporting the natural architecture of the eye. A subtle lift often creates a more youthful, refreshed appearance than adding more color ever could.
Quick Technique
Apply your transition shade using soft, controlled motions.
Blend toward the tail of your brow rather than straight across the crease.
Keep the outer edge softly diffused without extending downward.
Step back from the mirror and check whether the overall shape of the shadow guides the eye upward.
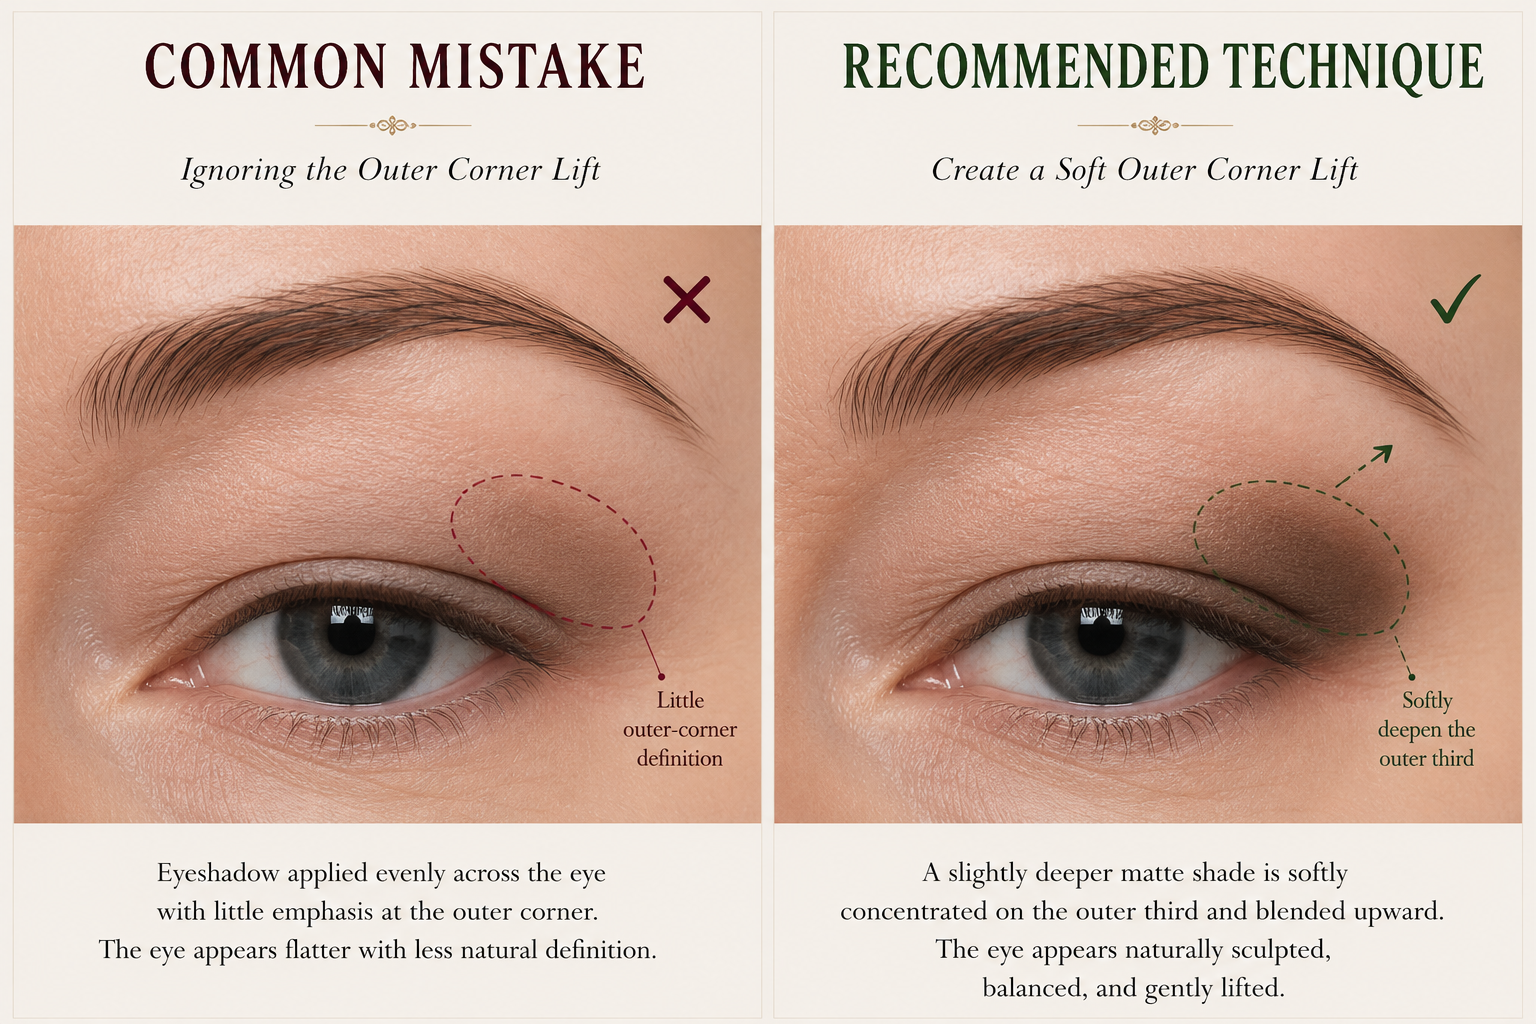
Ignoring the Outer Corner Lift
By this point, your transition shade is visible, your blending is moving upward, and the overall shape of your eyeshadow is beginning to support your eye rather than compete with it. The next step is creating gentle structure at the outer corner.
Many women concentrate on the center of the lid because that's where they notice the most visible space for color. Others blend their transition shade evenly across the eye but stop before adding any additional depth to the outer third. The makeup looks soft and polished, yet something still feels unfinished.
That's because the eye is missing an anchor.
The outer corner acts as the visual foundation of many eyeshadow looks. A touch of carefully placed depth helps define the shape you've already created and gives the eye a natural sense of lift. Without it, the shadow can appear flat, especially once the eye is open and part of the mobile lid disappears beneath the hood.
The goal isn't to create a dark outer "V" or a dramatic smoky eye. Those techniques often overwhelm hooded eyes by placing too much darkness where there is already natural shadow. Instead, think of adding just enough depth to reinforce the upward direction you've established in the previous lessons.
Keep the deeper shade concentrated on the outer third of the eye, allowing it to softly blend into the transition color you've already placed. As the color diffuses upward toward the tail of the brow, it creates gentle structure without harsh edges or obvious lines. The effect is subtle enough that most people won't notice the eyeshadow itself—they'll simply notice that your eyes appear more defined and naturally lifted.
One of the reasons professional eye makeup often looks effortless is restraint. Rather than covering large areas with dark color, experienced artists place depth only where it contributes to the overall shape. Every brushstroke has a purpose, and every darker shade supports the architecture already established.
Beauty Masterclass Note
Depth should be used to create structure, not darkness. On hooded eyes, a small amount of well-placed shadow on the outer corner often creates more lift than covering the entire lid with deeper color.
Quick Technique
After applying your transition shade, choose a matte shadow one or two shades deeper.
Place the color on the outer third of the eye, keeping it just above the natural fold.
Blend softly upward toward the tail of the brow while allowing the edges to fade seamlessly into the transition shade.
Keep most of the mobile lid lighter so the outer corner provides definition without overpowering the eye.
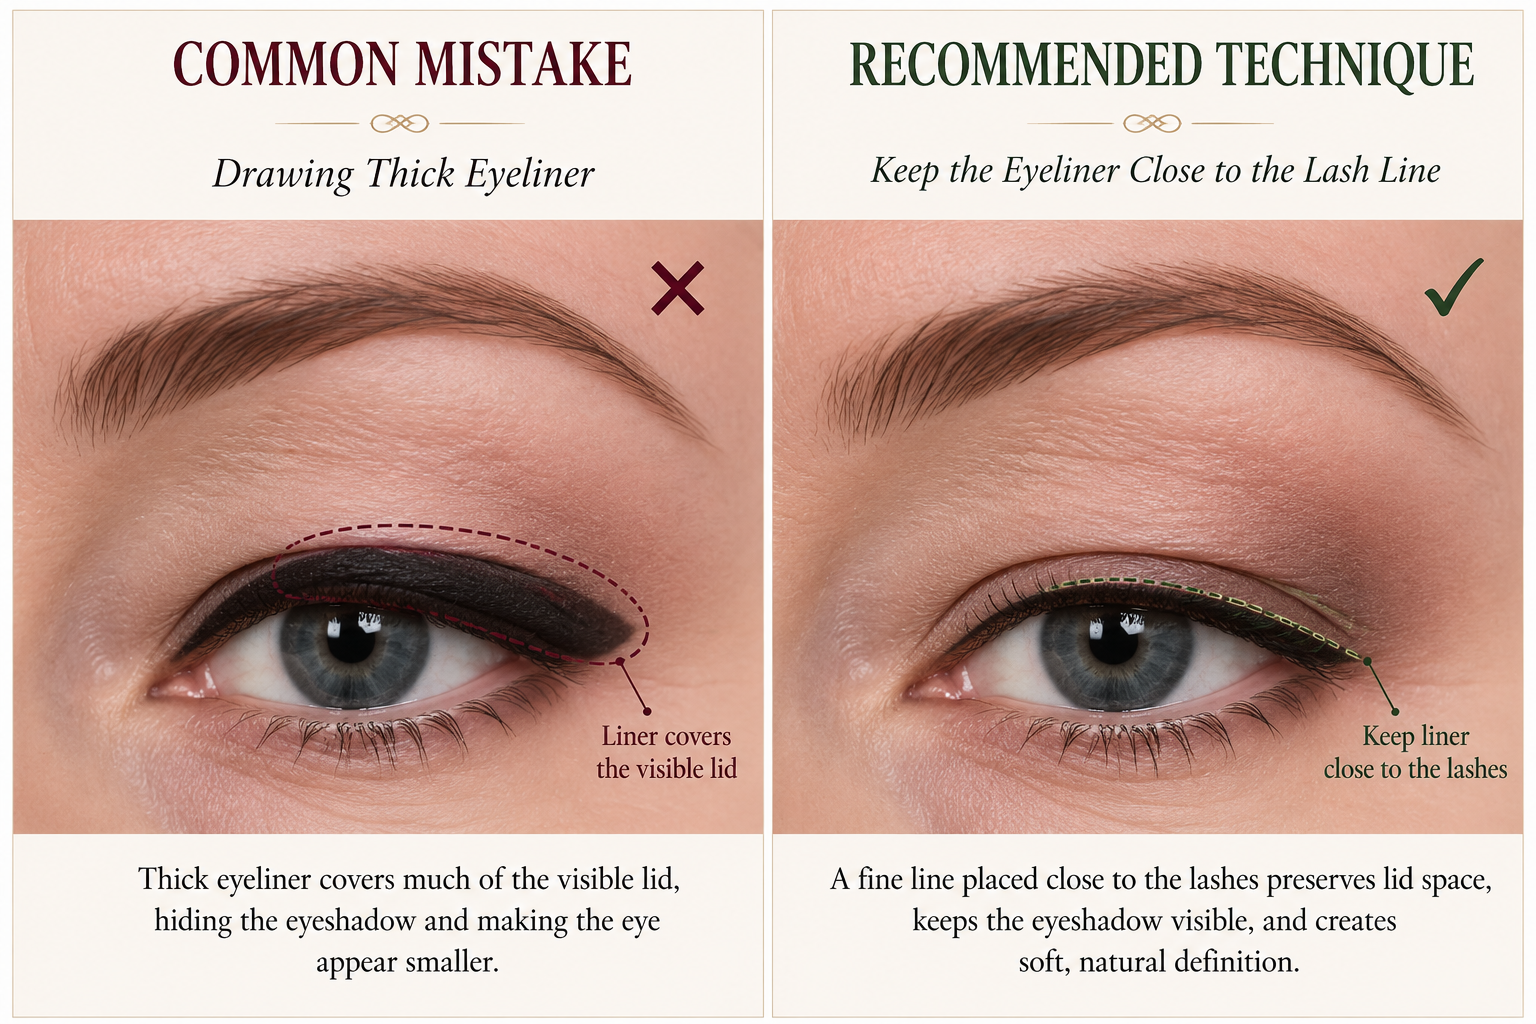
Drawing Thick Eyeliner
After you've created lift with your eyeshadow, it's easy to think eyeliner should provide the finishing statement. When the eyes still seem smaller than you'd like, the natural instinct is to make the liner a little thicker.
It feels like the logical solution.
If a thin line isn't noticeable enough, surely a thicker one will create more definition.
On hooded eyes, however, the opposite is often true.
Unlike eye shapes with a broad mobile lid, hooded eyes have a limited amount of visible space available for makeup. Every millimeter matters. As the eyeliner becomes thicker, it begins to occupy the very area that allows your eyeshadow to create shape and dimension. Instead of framing the eye, the liner gradually replaces the lid space that helps the eye appear open.
This is one of the reasons women often feel as though their eyeshadow disappears after applying eyeliner. The eyeshadow hasn't changed—the liner has simply become the dominant feature.
The goal of eyeliner isn't to cover the lid. Its purpose is to define the lash line.
A fine line nestled close to the roots of the lashes creates the illusion of fuller lashes while preserving the work you've already done with your eyeshadow. The transition shade remains visible, the outer corner continues to provide lift, and the overall makeup feels balanced rather than crowded.
If you enjoy a more dramatic look, that doesn't mean you have to abandon it. It simply means building definition strategically. Rather than increasing the width of the liner across the entire eye, concentrate additional depth near the outer third, where it supports the lifted shape you've already established.
The most flattering eyeliner on hooded eyes is rarely the one people notice first. Instead, it quietly enhances the eye while allowing every element of the makeup to work together.
Beauty Masterclass Note
On hooded eyes, eyeliner should define your lashes—not replace your lid space. Before making your liner thicker, ask yourself whether it is adding definition or simply covering the eyeshadow you've already worked to create.
Quick Technique
Begin with the thinnest line you can comfortably draw at the base of the upper lashes.
Keep the liner tucked into the lash line instead of extending high onto the lid.
If you'd like more definition, gradually deepen the outer third rather than increasing the width across the entire eye.
Check your eyeliner with your eyes open to be sure your transition shade and lid color remain visible.
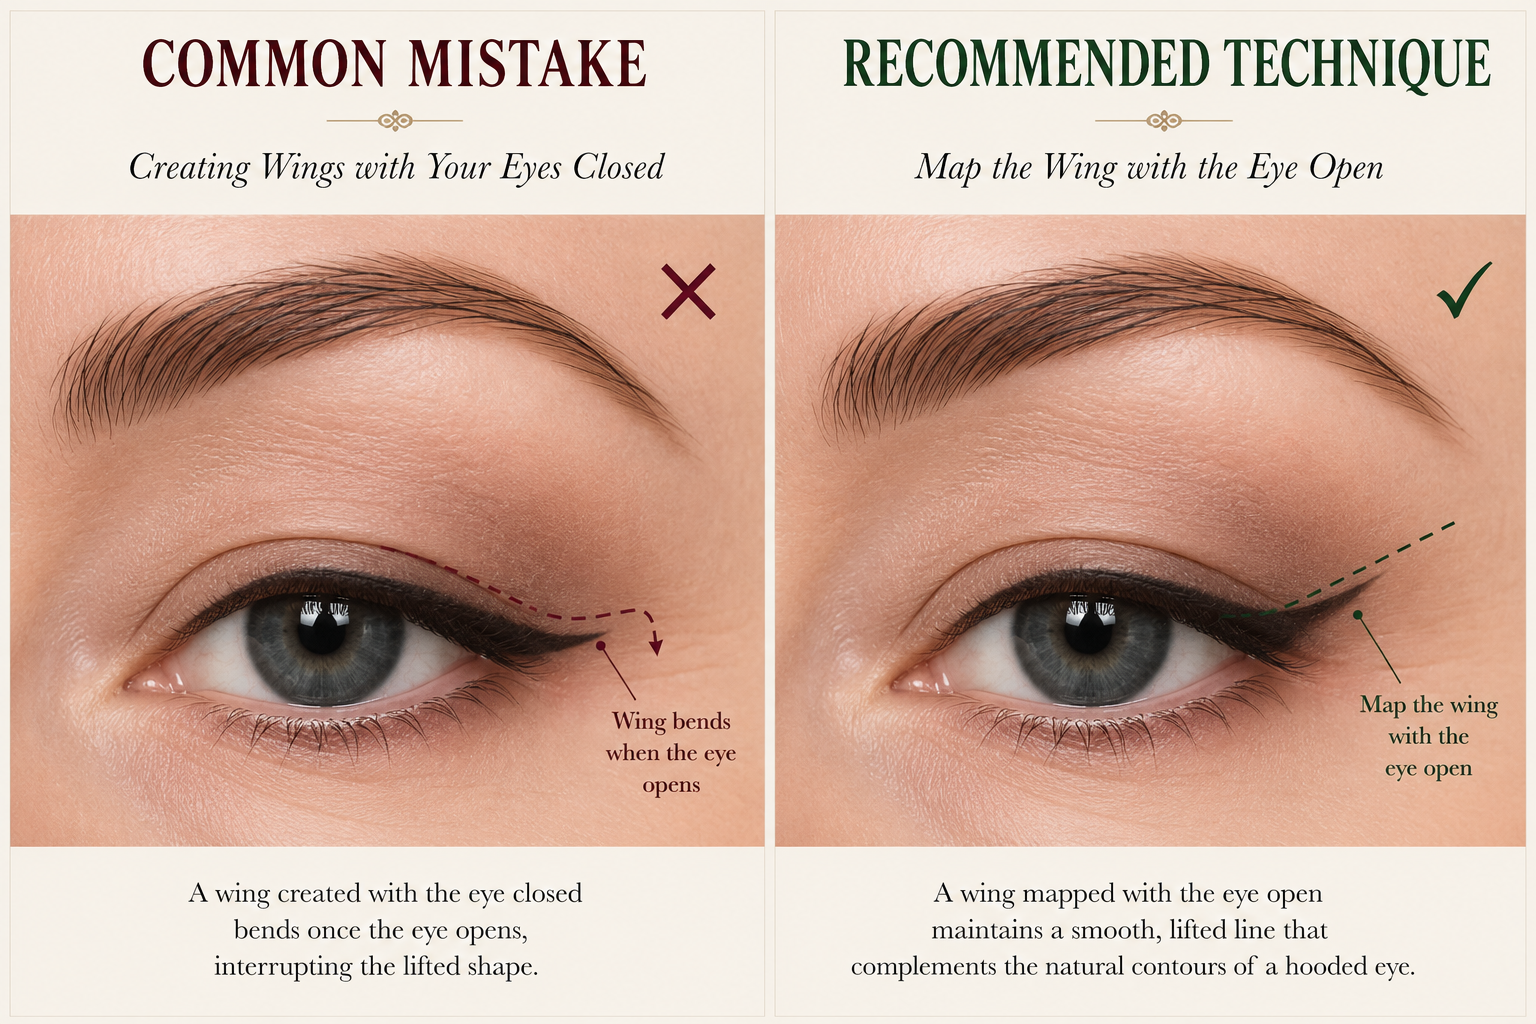
Creating Wings with Your Eyes Closed
A beautifully drawn wing can add elegance and definition to almost any eye look. Yet for women with hooded eyes, it is often one of the most frustrating techniques to master.
The reason isn't a lack of skill.
It's that most winged eyeliner tutorials are demonstrated on a closed eye.
When your eye is closed, the skin around the outer corner stretches into a smooth, uninterrupted surface. It's easy to draw a crisp, straight line that looks perfectly balanced. The moment you open your eye, however, everything changes. The fold settles back into its natural position, the outer corner shifts, and the wing you carefully created may appear to dip downward, develop a small bend, or disappear beneath the hood.
This is why so many women feel as though winged liner is unpredictable. They repeat the same steps each time, yet the finished result never quite matches what they expected. The problem isn't inconsistency—it's that the wing was designed for an eye position that exists only while the eye is closed.
Instead of treating a closed eye as your canvas, let your open eye become your guide.
When you look straight into the mirror with your eyes relaxed, you're seeing the shape everyone else sees. That is the position your wing should complement. By lightly marking the direction of the wing while your eye is open, you can judge its angle before committing to the final line. Once the overall shape looks balanced, you can briefly close your eye to connect and refine the liner.
This approach often feels slower at first because you're checking your work more frequently. With practice, however, it becomes surprisingly intuitive. Rather than hoping the wing will look right after you open your eye, you're designing it for the eye's natural resting position from the very beginning.
The goal isn't a perfectly straight line. It's a wing that looks harmonious when your face is relaxed and your eyes are naturally open.
Beauty Masterclass Note
A beautiful wing is judged with your eyes open—not while you're drawing it. Designing the shape for your natural resting position produces a result that feels balanced from every angle.
Quick Technique
Look straight into the mirror with your eyes relaxed and open.
Lightly mark the direction of your wing before drawing the full line.
Close your eye only long enough to connect the wing smoothly to your upper lash line.
Reopen your eye frequently and make small adjustments until the wing appears balanced from the front.
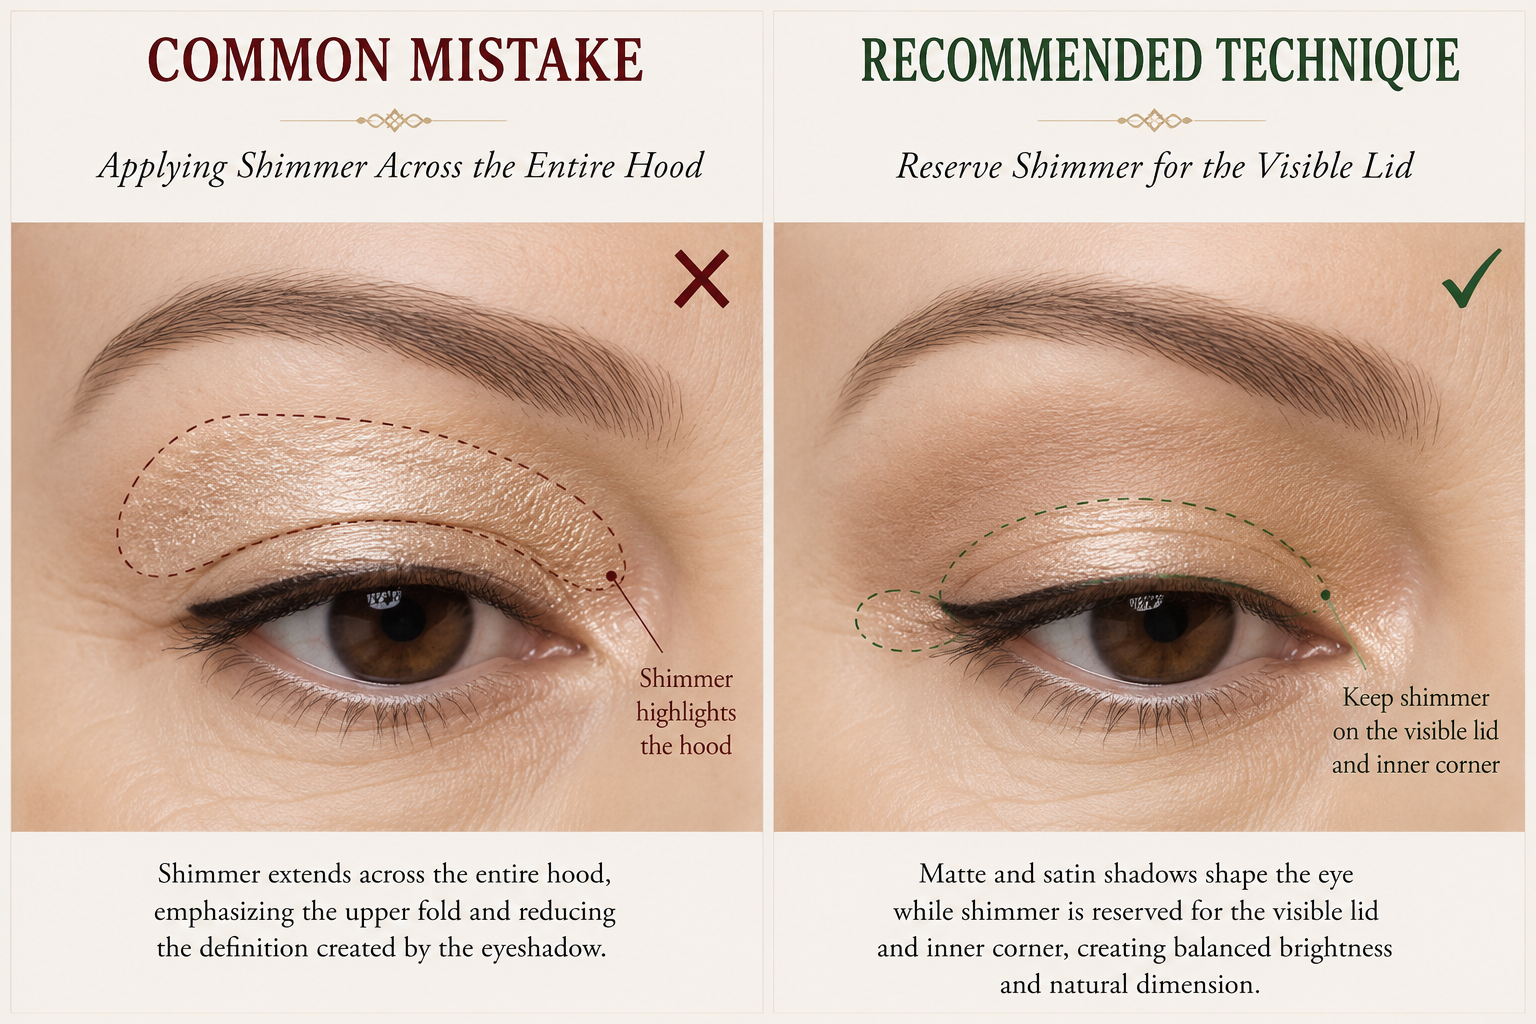
Applying Shimmer Across the Entire Hood
Shimmer has a way of making eye makeup feel special. A touch of light can brighten the eyes, add dimension, and create a beautiful finishing detail. It's no surprise that many tutorials recommend sweeping shimmer generously across the lid.
For hooded eyes, however, the placement of that light matters just as much as the placement of your shadow.
One of the most common habits is applying shimmer from the lash line all the way to the brow bone. It feels like an easy way to make the eyes appear larger and more luminous. Instead, it often has the opposite effect.
Light naturally draws attention to whatever it touches.
When shimmer covers the entire hood, it highlights the area that already projects forward. Rather than creating openness, it emphasizes the upper fold and reduces the visual contrast that gives the eye its shape. The makeup may sparkle beautifully, but the eye itself can appear fuller and less defined.
This doesn't mean hooded eyes should avoid shimmer altogether.
In fact, a thoughtfully placed shimmer can be one of the most beautiful finishing touches in an eye look. The difference is using it as an accent rather than a blanket of light.
Allow your matte or satin transition shades to create the structure of the eye. Then introduce shimmer only where it enhances that structure instead of competing with it. A soft touch on the center of the visible lid catches the light as you blink, while a hint at the inner corner brings brightness without drawing attention to the hood. These small moments of luminosity create dimension because they're surrounded by softer finishes.
Professional makeup artists often rely on this balance of texture. Matte shadows create contour, satin finishes soften transitions, and shimmer becomes the highlight—not the entire story. The result feels polished, dimensional, and effortless because each finish has a distinct purpose.
Beauty Masterclass Note
Think of shimmer as jewelry for your eyes. A single well-placed accent often creates far more elegance than covering the entire eye in sparkle. On hooded eyes, restraint allows the light to work for your eye shape instead of against it.
Quick Technique
Build your eye shape first using matte or satin shadows.
Apply shimmer only to the visible portion of the mobile lid or the center of the eye.
Add a small touch of luminosity to the inner corner if you'd like extra brightness.
With your eyes open, notice where the light naturally catches. If shimmer is drawing attention to the hood instead of the eye itself, soften or reduce the placement.
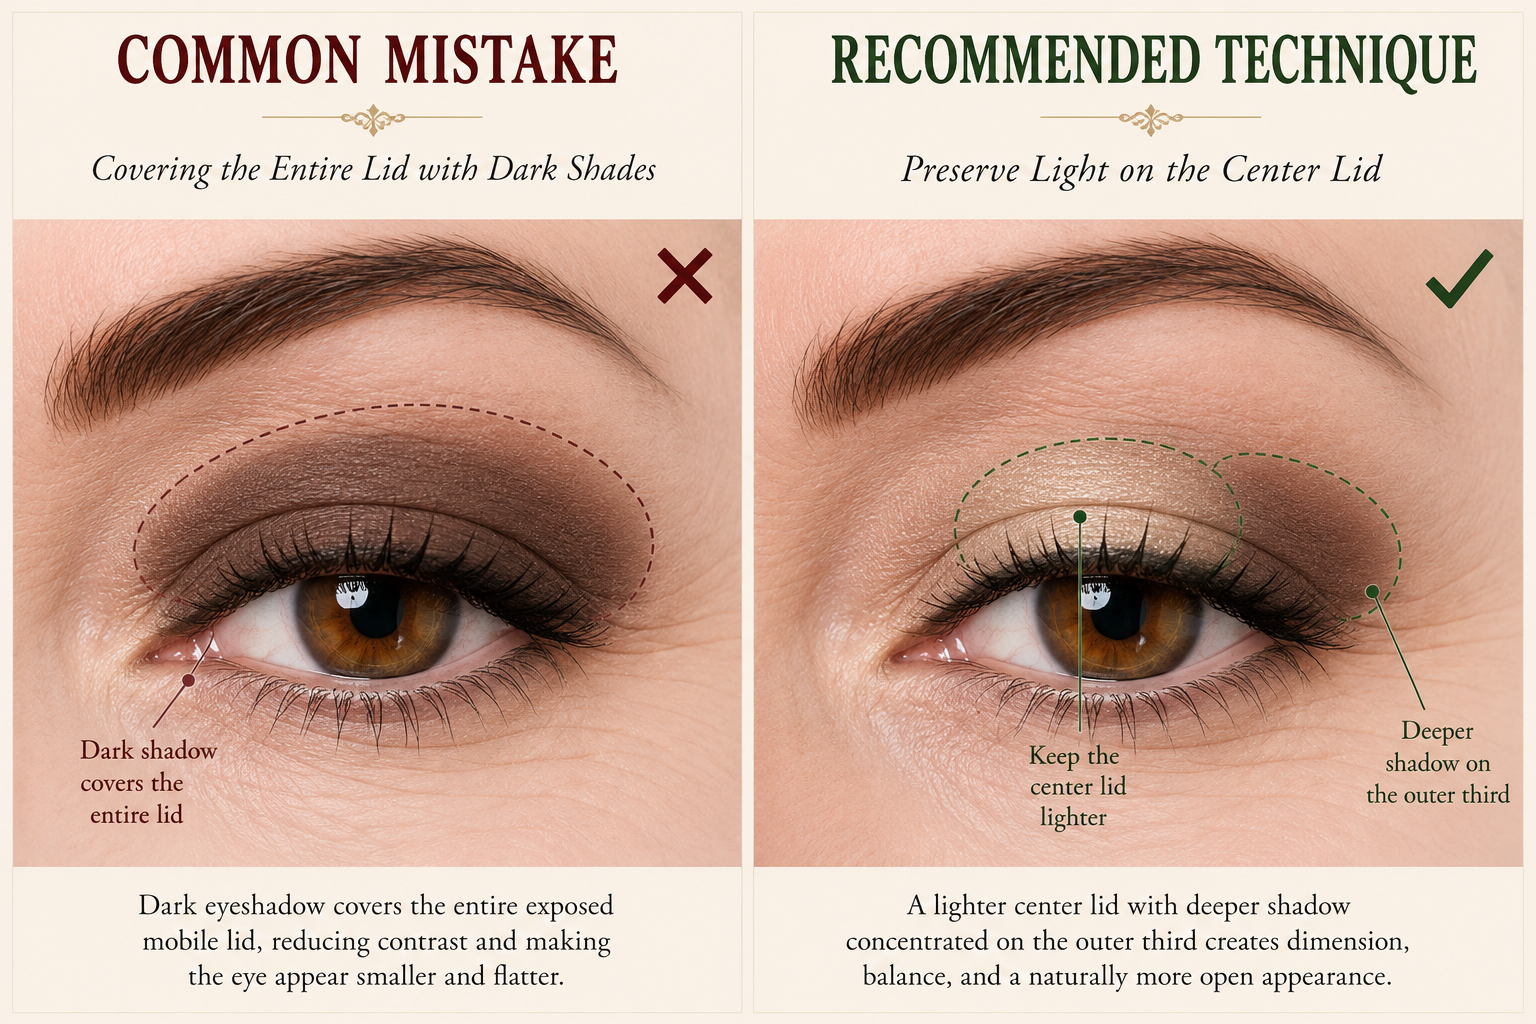
Covering the Entire Lid with Dark Shades
Dark eyeshadow is one of the most effective ways to create depth, but only when it's placed with intention. Many women assume that if a little definition looks good, covering the entire lid with a deeper shade will create even more impact.
On hooded eyes, that approach often has the opposite effect.
Because the visible lid is already limited, filling it completely with dark color can make the eye appear smaller and more closed. Instead of creating dimension, the eye begins to look flatter because there is very little contrast between light and shadow. The subtle shaping you've established in the previous steps becomes harder to appreciate.
One of the principles artists use to create dimension is contrast.
Light naturally brings features forward, while darker tones encourage them to recede. When the entire lid is covered with one deep shade, the eye loses the variation that gives it depth. Everything sits at the same visual level, making the makeup feel heavier than intended.
A more flattering approach is to let different areas of the eye perform different roles.
Allow the lighter shade on the center of the lid to reflect light and create openness. Let the transition shade soften the edges above the fold. Then use your deepest color where it contributes the most—along the outer third of the eye, blending gently into the outer corner you've already sculpted. Each shade supports the next, creating a gradual transition from light to depth rather than one continuous block of color.
This is one of the reasons professionally applied eye makeup often appears elegant rather than dramatic, even when several shades have been used. The eye doesn't become darker overall. Instead, the colors work together to create shape, balance, and dimension.
By this point in the Beauty Masterclass, you've learned that successful hooded-eye makeup isn't about using more product. It's about allowing every placement decision to contribute to the same overall goal: creating an eye that appears lifted, balanced, and naturally defined.
Beauty Masterclass Note
Dark eyeshadow creates its greatest impact when it's treated as a sculpting tool rather than a lid color. Preserving lighter areas allows the eye to reflect light, while carefully placed depth creates the dimension that makes the makeup feel polished and effortless.
Quick Technique
Apply your lighter lid shade across the center of the visible mobile lid.
Concentrate your deepest matte shade on the outer third of the eye, keeping it connected to the outer corner.
Blend the darker shade softly into your transition color without carrying it across the entire lid.
Step back from the mirror and check that your eye still has a balance of light, medium, and deep tones rather than one continuous dark surface.
Don't Copy Makeup Tutorials—Translate Them
One of the most discouraging moments in makeup happens when you carefully follow a tutorial, step by step, yet your finished look bears little resemblance to the one on your screen.
It's easy to assume you've done something wrong.
In reality, you may have executed every technique exactly as it was demonstrated. The difference is that you were working on a different canvas.
Most makeup tutorials are demonstrations, not universal formulas. Every artist teaches on the face in front of them, and every face has its own proportions. An eye with a broad mobile lid, a prominent brow bone, a high crease, or very little hooding responds differently to the same placement than an eye where much of the lid naturally disappears when open.
This is why copying placement rarely produces identical results.
The most successful makeup artists don't memorize where someone else applied a shadow or liner. They learn why it was placed there.
Perhaps the artist is trying to create depth. Perhaps they're lifting the outer corner, softening a transition, or directing light toward the center of the eye. Once you understand the purpose behind each step, you no longer need to copy the exact placement. Instead, you can recreate the same visual effect on your own anatomy.
That shift changes everything.
Rather than asking, "Where did she put her eyeshadow?" you begin asking, "What was she trying to achieve?"
When you understand the intention, you become free to adjust the placement to suit your own eye shape. The transition shade may sit slightly higher. Your eyeliner may be finer. Your shimmer may be more restrained. Yet the finished effect can still communicate exactly the same feeling—lift, balance, softness, or definition.
This is the point where makeup stops feeling like a series of rules and starts becoming a conversation between technique and anatomy.
Every lesson in this Beauty Masterclass has been built on that idea. Instead of teaching you to imitate another person's eye shape, you've learned to work with your own. You now understand why placement matters, how blending influences shape, where depth creates lift, why texture changes perception, and how proportion affects the finished result.
Those principles are far more valuable than any individual tutorial because they'll continue to guide every eye look you create, regardless of changing trends or new products.
The goal was never to teach you one perfect makeup look.
It was to help you understand your eyes well enough to create beautiful makeup with confidence.
Beauty Masterclass Note
The best makeup artists don't ask, "What works for everyone?" They ask, "What will create the most beautiful result for this face?" Once you begin approaching your own makeup with that same mindset, every tutorial becomes a source of inspiration rather than a set of instructions to copy.
Quick Technique
Before following a tutorial, spend a moment observing the instructor's eye shape.
Identify the purpose behind each step—whether it's creating depth, adding lift, softening transitions, or directing light.
Adapt the placement to suit your own anatomy instead of copying the exact locations.
Judge your finished makeup by how beautifully it complements your features, not by how closely it resembles someone else's.
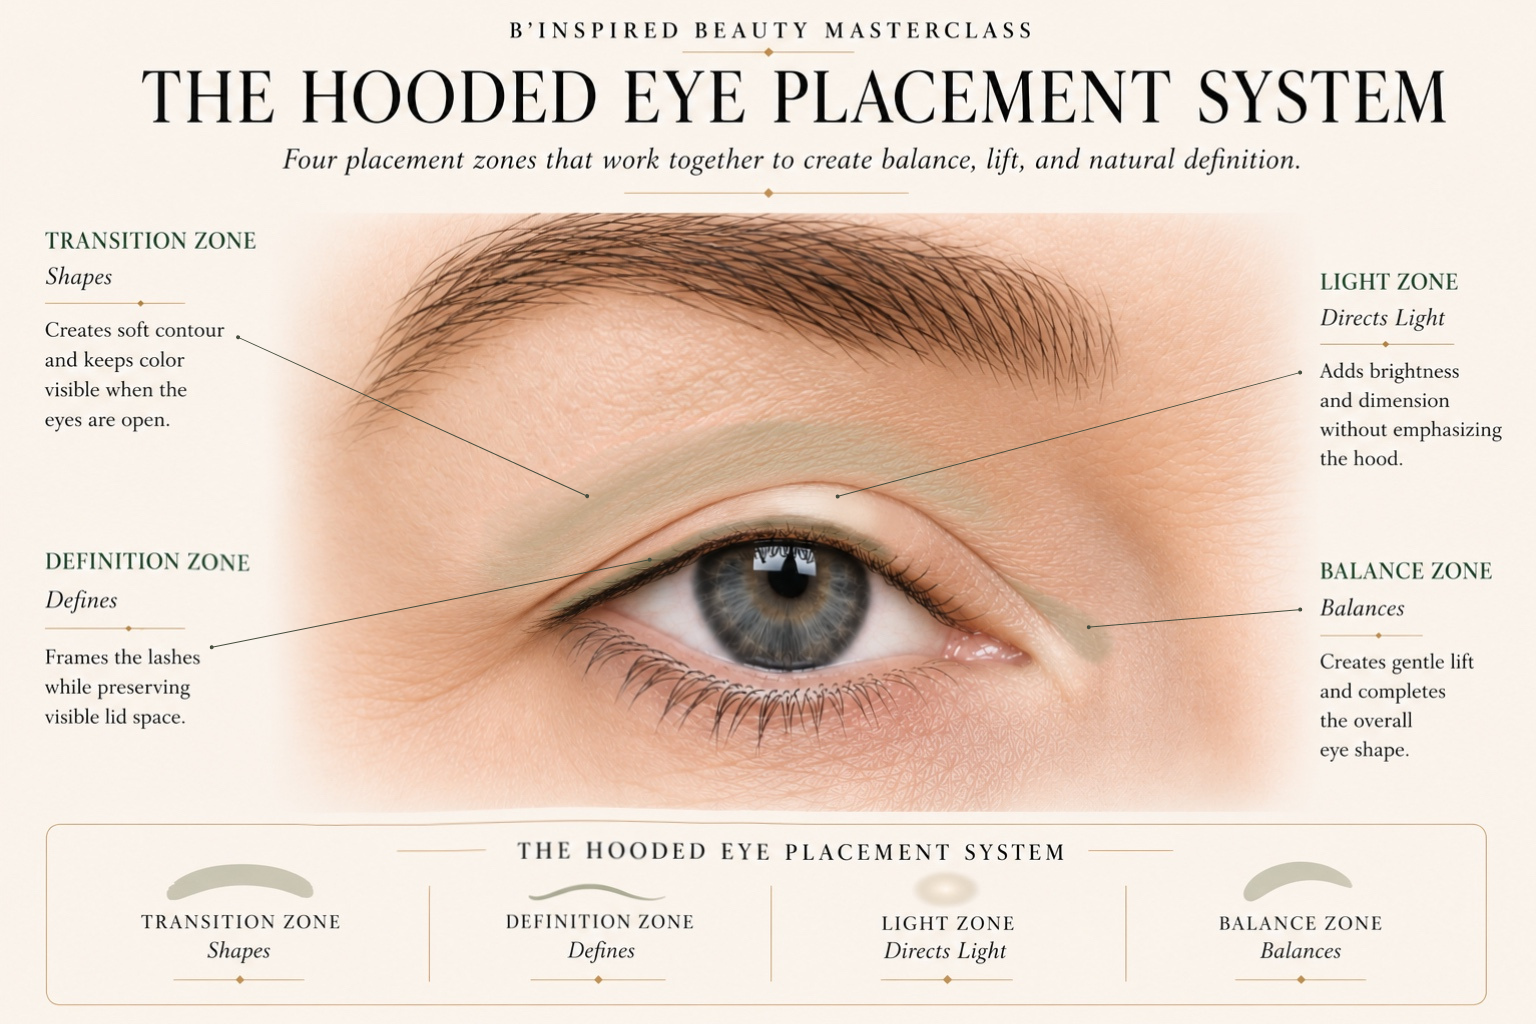
By now, you've probably noticed that none of the techniques in this guide depend on buying different products or mastering complicated application methods. Nearly every adjustment comes down to one question:
Where will this placement have the greatest effect?
That question becomes much easier to answer once you begin thinking of the eye as a series of working zones rather than one continuous surface. Each area has a different role in shaping, balancing, and defining the eye. When makeup is placed with those roles in mind, every product begins working together instead of competing for the same space.
Zone One: The Transition Zone
The area just above the natural fold is where much of the shaping happens on a hooded eye. A softly blended transition shade creates the gentle contour that connects the deeper colors to the surrounding skin. It also provides the framework that allows the rest of the eye makeup to feel balanced and refined.
Zone Two: The Definition Zone
The lash line is where definition belongs. Rather than covering the lid with thick eyeliner, concentrate depth as close to the lashes as possible. This strengthens the appearance of the lash line while preserving the proportions created by your eyeshadow.
Zone Three: The Light Zone
The center of the mobile lid and inner corner naturally catch the light. Small touches of shimmer or luminosity here draw attention toward the eye itself instead of the upper fold. Because these highlights are used selectively, they brighten without competing with the natural contours you've created.
Zone Four: The Balance Zone
The outer corner is where the entire look comes together. Softly blended depth, a carefully proportioned liner, or a subtle wing should support the overall shape of the eye rather than dominate it. Small adjustments here often have a greater influence on the finished result than adding more product elsewhere.
When each zone is given a clear purpose, eye makeup becomes much easier to evaluate. Instead of asking whether you've used enough shadow or enough eyeliner, you begin asking whether each placement is contributing to balance, contour, depth, and light. Those questions naturally lead to more flattering results because every brushstroke has a job to do.
Beauty Masterclass Note
Professional makeup artists rarely think in terms of products alone. They think about what each placement is accomplishing. Once you begin approaching your own makeup the same way, application becomes less about following steps and more about creating balance, depth, and harmony that suit your own features.
Quick Reference:
The Hooded Eye Placement System
Transition Zone → Softly contour and shape the eye.
Definition Zone → Frame the lashes while preserving proportion.
Light Zone → Direct attention and create brightness.
Balance Zone → Refine the overall shape and lift the eye.
Products That Work Well for Hooded Eyes
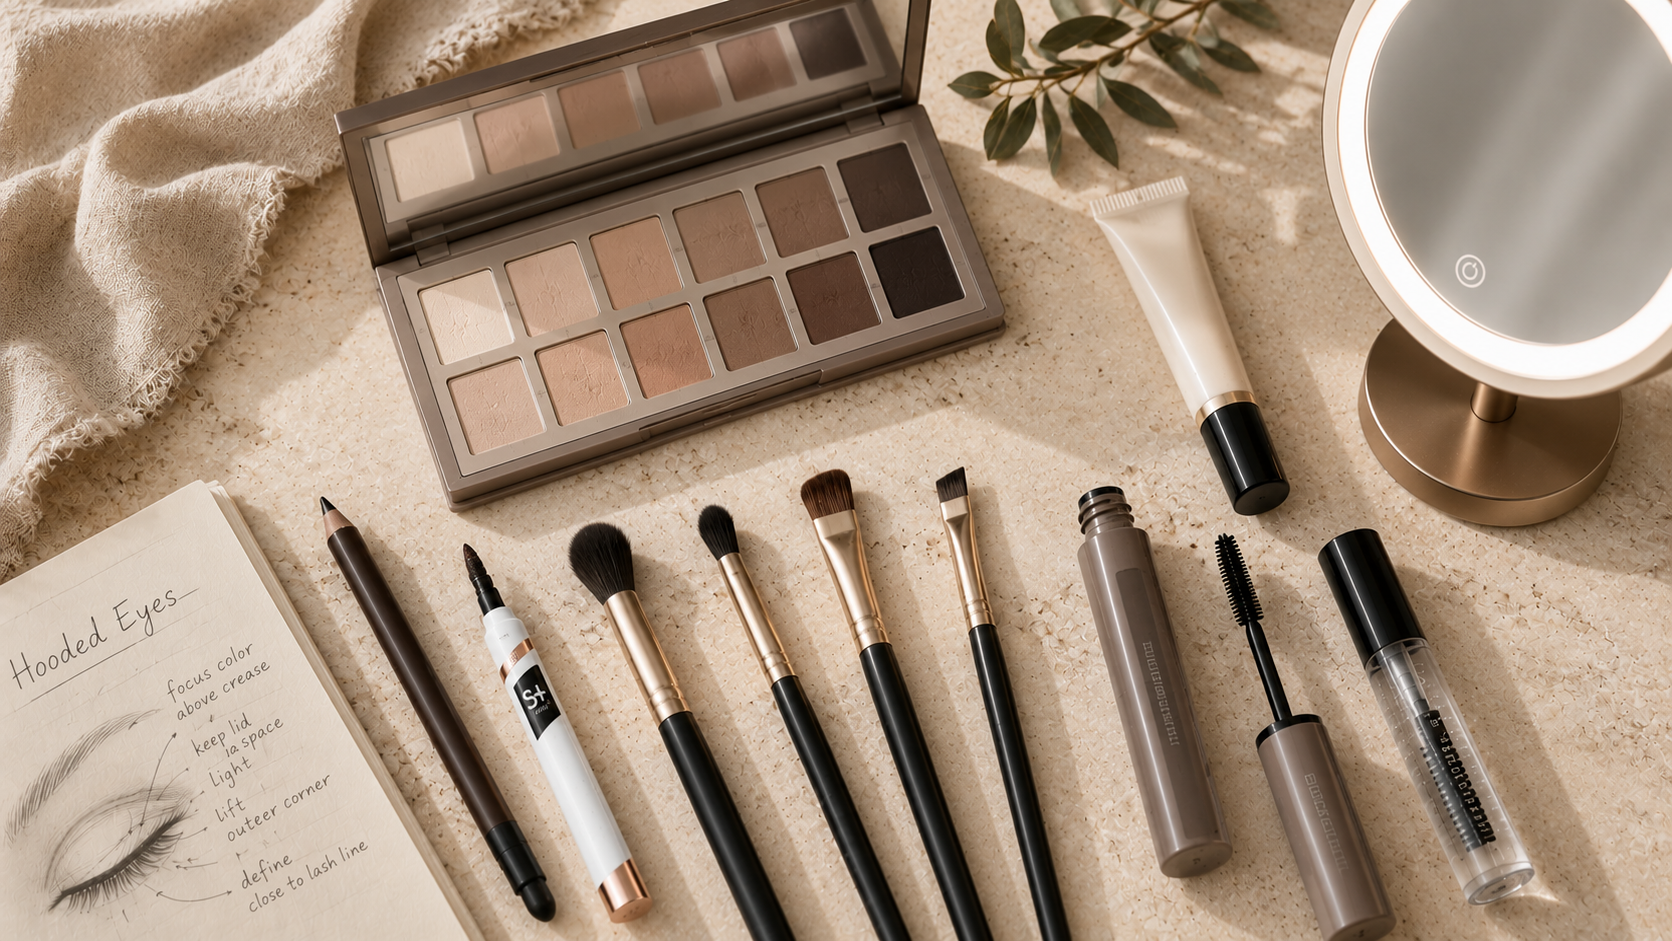
Once you understand how hooded eyes respond to light, movement, and proportion, choosing products becomes much simpler. Instead of looking for products specifically labeled "for hooded eyes," look for formulas and tools that support the techniques you've learned throughout this guide.
Each of the categories below solves a different visual challenge. Together, they create a routine that is easier to apply, longer lasting, and more flattering to hooded eyes.
Eye Primer
Supports: Longevity • Blending • Crease Resistance
Because the upper lid naturally folds against itself throughout the day, hooded eyes are more likely to experience creasing and color transfer. A good eye primer creates a smooth surface, improves color payoff, and helps shadow stay where you intended it to be.
Look for primers that:
Extend wear time
Minimize creasing
Dry to a smooth, slightly tacky finish
Work well with both matte and shimmer formulas
Editor's Beauty Picks
(Affiliate product recommendations)
Eyeshadow Brushes
Supports: Placement • Blending • Precision
Beautiful eye makeup depends as much on the brush as the eyeshadow.
For hooded eyes, smaller brushes often provide better control because they allow you to shape color exactly where you want it instead of spreading pigment too broadly.
A well-rounded collection doesn't need to be large. Most women can create nearly every look with four essential brushes:
Fluffy blending brush
Small tapered crease brush
Flat shader brush
Pencil/detail brush
Editor's Beauty Picks
(Affiliate recommendations)
Matte Eyeshadows
Supports: Contour • Shape • Soft Definition
If I could recommend only one type of eyeshadow for hooded eyes, it would be matte.
Matte finishes create gentle contour without competing with the natural highlights already present on the eye. They shape the eye quietly, allowing depth to develop through shadow rather than sparkle.
Look for palettes that include:
Transition shades
Mid-tone contour colors
Deeper defining shades
Neutral mattes for everyday wear
Editor's Beauty Picks
(Affiliate recommendations)
Cream Eyeshadows
Supports: Simplicity • Long Wear • Everyday Makeup
Cream shadows can work beautifully on hooded eyes when the formula sets completely after application.
Choose products that dry down rather than remain creamy throughout the day. Once set, they provide soft washes of color with minimal effort and are particularly useful for everyday makeup.
Avoid formulas that remain tacky, as they are more likely to transfer onto the upper fold.
Editor's Beauty Picks
(Affiliate recommendations)
Gel Eyeliner
Supports: Precision • Definition • Control
Gel eyeliner offers one of the best combinations of control and longevity for hooded eyes.
Whether used with an angled brush or in pencil form, it allows you to create a fine line that defines the lashes without overwhelming the eye.
Look for formulas that are:
Waterproof
Smudge-resistant
Long-wearing
Easy to control
Editor's Beauty Picks
(Affiliate recommendations)
Tubing Mascara
Supports: Lift • Smudge Resistance • Clean Wear
Many traditional mascaras transfer onto the upper fold throughout the day.
Tubing mascaras work differently. Instead of coating each lash with waxes alone, they form tiny flexible tubes around each lash, making them much less likely to smudge while remaining easy to remove with warm water.
For many women with hooded eyes, this single product can make a noticeable difference in how polished their eye makeup looks by the end of the day.
Editor's Beauty Picks
(Affiliate recommendations)
Heated Lash Curler
Supports: Lift • Proportion • Openness
Curling the lashes before mascara changes the way the entire eye is framed.
Rather than pointing forward, lifted lashes create space between the lash line and the upper fold, helping the eyes appear more open without adding additional eyeliner or eyeshadow.
Using a heated curler protects your lashes from breaking, which can happen from using traditional lash curlers.
Editor's Beauty Picks
(Affiliate recommendations)
Lighted Makeup Mirror
Supports: Accuracy • Balance • Confidence
Good lighting may be the most overlooked beauty tool of all.
A quality lighted mirror allows you to judge blending, proportion, and symmetry far more accurately than overhead bathroom lighting.
Look for a mirror with:
Natural daylight illumination
Adjustable brightness
5x or 10x magnification for detail work
A standard mirror for evaluating the overall effect
Remember to step back periodically and view your makeup from a normal conversational distance. That's how other people will actually see it.
Building Your Hooded Eye Makeup Kit
A successful hooded eye routine isn't built by collecting more products. It's built by choosing products that support thoughtful placement, soft blending, balanced proportions, and lasting wear.
Once those foundations are in place, your makeup routine becomes less about correcting your eye shape and more about enhancing the features you already have.
Frequently Asked Questions
Can Hooded Eyes Wear Shimmer?
Absolutely. The key isn't whether you wear shimmer—it's where you place it.
Shimmer naturally attracts attention because it reflects light. On hooded eyes, concentrating shimmer on the center of the mobile lid or the inner corner brightens the eye without emphasizing the upper fold. Matte and satin shades can then create the soft contour that gives the shimmer something beautiful to contrast against.
Think of shimmer as an accent rather than the foundation of the look.
Can Hooded Eyes Wear Winged Eyeliner?
Yes. In fact, a well-balanced wing can beautifully complement hooded eyes.
The difference is that the wing should be designed for your eye in its natural resting position rather than copied directly from someone else's tutorial. A slightly smaller, softer wing often follows the eye's natural movement more gracefully than one that's long or dramatically angled.
The goal is balance—not length.
Should Hooded Eyes Wear Dark Eyeshadow?
Yes, but use it intentionally.
Deeper shades create beautiful depth and definition when they're blended gradually and placed where they support the overall shape of the eye. Applying very dark color across large areas of the lid can sometimes make the eye feel heavier, while concentrating depth near the outer corner or along the lash line creates contrast without overwhelming the eye.
Dark shadow isn't the problem. Abrupt placement usually is.
Do Hooded Eyes Become More Noticeable With Age?
For many women, yes.
The natural softening of the upper eyelid and subtle changes in brow position often make an existing hood more noticeable over time. This is a normal part of facial aging and affects every eye shape differently.
Fortunately, the principles in this guide become even more valuable with age. Small adjustments in placement, proportion, and blending often create a more noticeable improvement than changing products altogether.
Can Hooded Eyes Wear False Lashes?
They certainly can.
The most flattering styles are usually lightweight and slightly shorter through the inner corner, with gentle length toward the outer third of the lash line. Very dense or dramatically long lashes can sometimes compete with the limited space on the lid and make the eye feel heavier.
Often, a natural-looking lash enhances the eye more beautifully than a dramatic one.
How Do I Stop Eyeshadow From Transferring?
Transfer usually happens because the upper lid naturally comes into contact with itself throughout the day.
A reliable eye primer, long-wearing formulas, and allowing each layer to set before applying the next all help reduce transfer. Choosing thinner layers of product rather than heavy applications can also improve wear time.
If transfer still occurs occasionally, remember that this is a characteristic of the anatomy—not a sign that you're doing your makeup incorrectly.
Do Hooded Eyes Need Completely Different Makeup?
No.
The products themselves are often the same. What changes is how they're used.
Once you begin thinking about contour, proportion, light, and placement instead of following fixed formulas, you'll find that many techniques you already know simply need small adjustments rather than a complete overhaul.
That's why understanding your eye shape is far more valuable than memorizing a list of rules.
Continue Your Beauty Masterclass

Understanding hooded eyes is one piece of learning how makeup works with your features rather than against them. Every lesson in the Beauty Masterclass builds on the same philosophy: when you understand the purpose behind a technique, application becomes simpler, more consistent, and far more flattering.
If you're ready to continue, these guides expand on the principles you've learned here.
The Makeup Colors & Techniques That Brighten, Lift & Enhance Mature Eyes
Build a complete understanding of how color, light, texture, and placement work together to create brighter, more balanced eyes. This comprehensive guide brings together the core principles behind mature eye makeup and serves as the foundation for the entire Beauty Masterclass series.
The Most Flattering Eyeliner Techniques for Mature Eyes: Softness, Lift, and Brightness
Discover how subtle adjustments in eyeliner placement, width, and shape can define the eyes without making them appear smaller or heavier. Learn when to soften, where to build depth, and how to create graceful lift while preserving the eye's natural proportions.
How to Choose the Most Flattering Blush After 50: Placement, Color, and Lift
Blush does far more than add color. Placement influences facial balance, creates the illusion of lift, and brings harmony to the complexion. This guide explores how blush works with your unique facial structure to create a naturally refreshed appearance.
The Refined Beauty Edit
Beautiful makeup begins with thoughtful techniques, but the right tools make those techniques easier to achieve.
Browse The Refined Beauty Edit for my curated collection of favorite primers, brushes, eyeshadows, eyeliners, mascaras, skincare, and beauty tools that consistently perform well for mature skin and hooded eyes. Every recommendation has been chosen because it supports the principles taught throughout the Beauty Masterclass—helping you create makeup that is beautifully balanced, long-wearing, and effortless to wear.
A Final Thought
The goal of the Beauty Masterclass has never been to teach you a collection of rules. It's to help you understand your features well enough that every technique, product, and tutorial becomes easier to evaluate with confidence.
Once you begin seeing makeup through the principles of light, contour, proportion, balance, and thoughtful placement, you'll no longer wonder whether a trend is "right" for you. You'll understand how to adapt it so it complements the face that's uniquely yours.
Disclosure: This article may contain affiliate links. If you make a purchase through these links, I may earn a commission at no additional cost to you.
